
With a development machine running Windows 10 and Apache HTTP Server, to use and test web services hosted locally using an encrypted (TLS) connection (or using the https protocol), you need to set up certificates for the machine’s web server. To do that, you need a CA to sign the certificates. That can be either expensive or not possible with services like LetsEncrypt. They won’t sign certificates for localhost or a private IP address. So you have to set yourself up as a CA and then issue certificates. Once you have done that, you can create certificates for your development machine’s web server. Finally you can tell your local machine that the CA that you invented is trusted.
All this can be done with openSSL. If you don’t have openSSL installed you need to get it here.
Environment Notes
This guide assumes that your environment is set up like mine (unlikely, but maybe it is close enough). Here is what is on my dev machine:
- Running Apache HTTP Server installed in a directory called c:\webserver\apache24. The server is up and operating normally (you can get a simple page served up on a local browser with no errors reported in the Apache error log).
- My server is identified by its IP address: 10.0.0.100 or localhost.
- For the local web server I keep all of the various certificate files in the conf directory
- In the command examples below I am using the locations and file names that I need for my particular needs. You should replace the locations and file names with whatever makes sense for your environment.
Set Up Your Signing Authority
By setting yourself up as a signing authority (using a “self-signed” certificate) you will not have a certificate that anyone else would consider to be secure. This is only good for servers that are on isolated or private networks. Don’t try this on a server that is exposed to the Internet. For that use a real CA like LetsEncrypt.
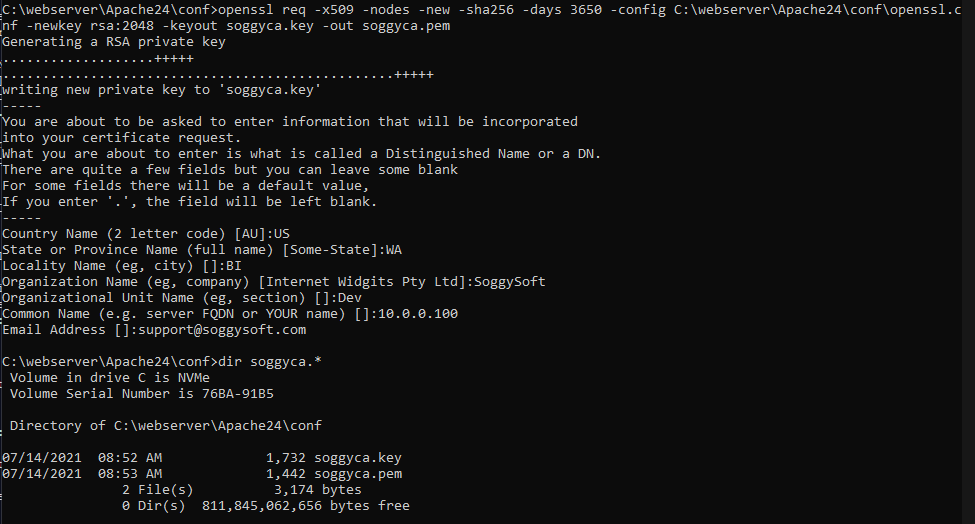
There are two steps for setting yourself up as a singing authority. First, we need to create the .key and .pem files using openSSL. In a console window with admin privileges change the directory to where you want to place your certificates. In my case it is c:\webserver\apache24\conf.
Enter the command openssl req -x509 -nodes -new -sha256 -days 3650 -config C:\webserver\Apache24\conf\openssl.cnf -newkey rsa:2048 -keyout soggyca.key -out soggyca.pem
openssl comes from Singing Light (the link above) with the location of the .cnf file hard-coded into the binaries. You can get around this by specifying where your .cnf file lives with the -config command line option. You should replace “C:\webserver\Apache24\conf\openssl.cnf” with the complete path of the location of your openssl.cnf file. The .key and .pem files that are created can have whatever names you want – just remember what they are, you will need them later.
The -days command indicates how long the certificate should be valid for. The default is one year. I don’t like to do this every year so I make it 10 years or 3650 days. You can see what all the other options do by reading the OpenSSL documentation.
When you run this command you will be asked a number of questions about who is creating this certificate. You can answer them however you like since this is only for your local environment but the information will be displayed in a browser’s certificate viewing feature. You can answer all of the questions interactively or you can put the data in the command line (see the documentation to see how to do that).
Here is how it looks in my environment and you can see that the two files have been created:
Next, we need to create a .crt file. We do that with the command openssl x509 -outform pem -in soggyca.pem -out soggyca.crt This is how it looks for me:
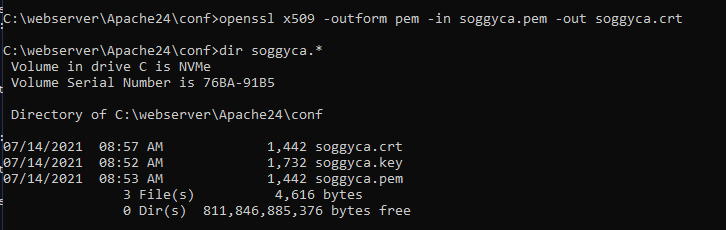
You should now have three files: .crt, .key and .pem. These files represent your Certificate Authority (or CA) which are used to create server certificates that will make using SSL possible on your development server.
Create Certificates For Your Server
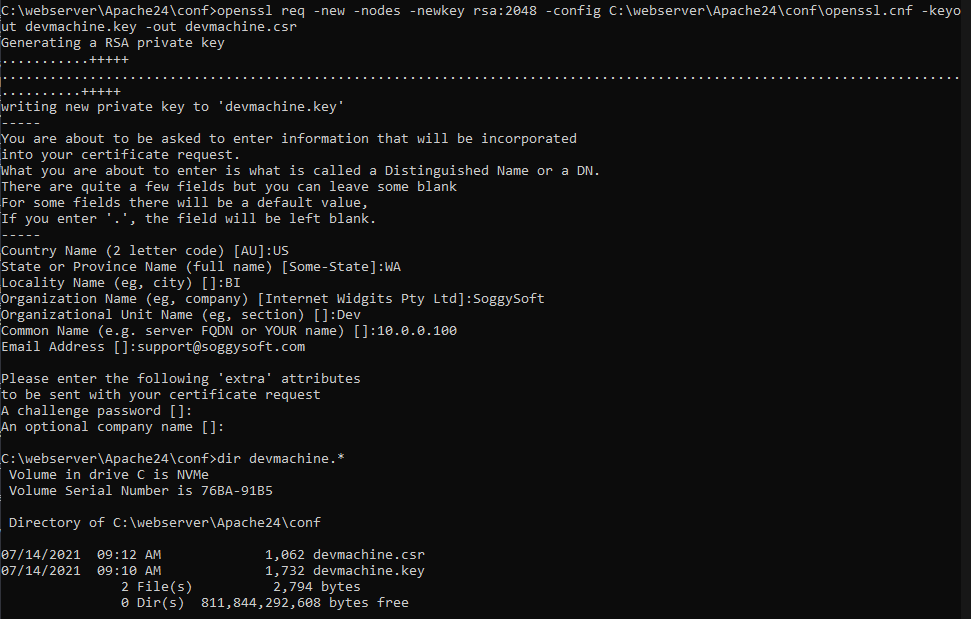
Now we can create certificates for your development webserver. This is whole lot like creating the CA root certificates like you did in the steps above. First, create a .key and a new file called a .csr using the following command: openssl req -new -nodes -newkey rsa:2048 -config C:\webserver\Apache24\conf\openssl.cnf -keyout devmachine.key -out devmachine.csr
I’ve named my dev machine’s certificates devmachine but you can use whatever name makes sense for you – just replace the names in the command line as you see fit. Again, you have to point to the openSSL configuration file like you did before. You will also have to enter all of the same (or different if you want) information interactively like you did before.
You will be asked two new questions: a challenge password and an optional company name. Leave the password empty. The company name will be displayed with the certificate information in the browser if someone inspects the certificate.
Now you will need to create a file that openSSL will use to create the actual server certificate that Apache will use to create a TLS connection. The file specifies how the key can be used and what domains can use it. In your text editor (like Notepad++) create a new file and enter the following:
authorityKeyIdentifier=keyid,issuer
basicConstraints=CA:FALSE
keyUsage = digitalSignature, nonRepudiation, keyEncipherment, dataEncipherment
subjectAltName = @alt_names
[alt_names]
DNS.1 = localhost
DNS.2 = 10.0.0.100
Save the file using a name you will need in the next step – I saved it as domains.ext. The parts you need to change are the last two lines. Enter as many names as your dev server uses. I always use 10.0.0.100 as my web server address. localhost is in there in case I lose my mind. The server will only allow TLS connections if the domain in the request URL is in this list. if you have your server set up to respond to myserver then myserver should be listed in this file.
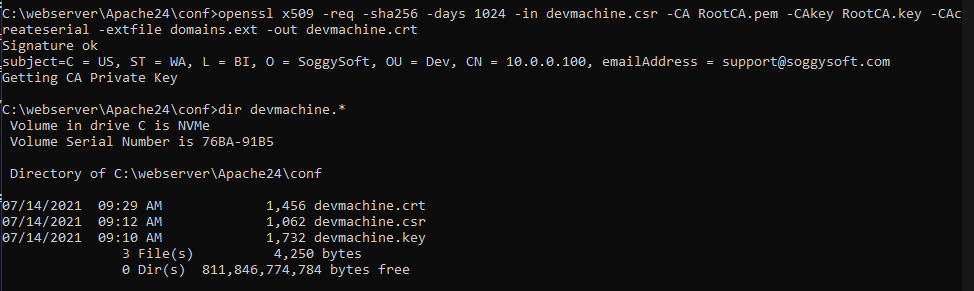
Now we use the file you just made along with some other files you created already to create the server certificate: openssl x509 -req -sha256 -days 1024 -in devmachine.csr -CA soggyca.pem -CAkey soggyca.key -CAcreateserial -extfile domains.ext -out devmachine.crt
Notice that there are several places in the command that need to have the names of files that you created above.
Now we have all the certificate files that we need to finish setting up the server.
Apache HTTP Server Configuration
There are a couple of configuration files that will need to reference the new certificate files you just created. The first is the Apache configuration file usually called httpd.conf. If your server is already working (and it should be before you go any further) this file will already have the particulars for your server set up. If you are using virtual hosts then you will have to adapt these instructions for your environment. I am not using virtual hosts.
In the httpd.conf file uncomment the following:
LoadModule ssl_module modules/mod_ssl.so
LoadModule socache_shmcb_module modules/mod_socache_shmcb.so
Add the line
Include conf/extra/httpd-ssl.conf
Now we need to go edit the httpd-ssl.conf file we just tried to include.
In the <VirtualHost _default_:443> section there should be a general setup block. If there isn’t one, add it with the correct locations for files and such.
#General setup for the virtual host
DocumentRoot "c:/webroot"
ServerName 10.0.0.100:443
ServerAdmin support@soggysoft.com
ErrorLog "c:/logs/ssl_error.log"
TransferLog "c:/logs/access.log"
DocumentRoot should be the location of your web files and may or may not match the location of files for the insecure server. In my case, they are the same. The ServerName is what you call your web server and the “domain” that you use to access it locally. Log files are for SSL specific errors and you can have a separate access log for TLS connections.
You need to specify where the server certificate can be found:
SSLCertificateFile "c:/webserver/Apache24/conf/devmachine.crt"
And you need to specify where the server private key can be found:
SSLCertificateKeyFile "c:/webserver/Apache24/conf/devmachine.key"
Make sure you have saved your httpd.conf and http-ssl.conf files and restart the server. If it is all working you will not have any error messages in your error logs and if you try to load a page using the TLS protocol (https://somepage.html) you will get a warning that there is a security risk ahead. If the page just won’t load then there is a problem – go back and check that you did everything right.
Trusting Your Self-Signed CA
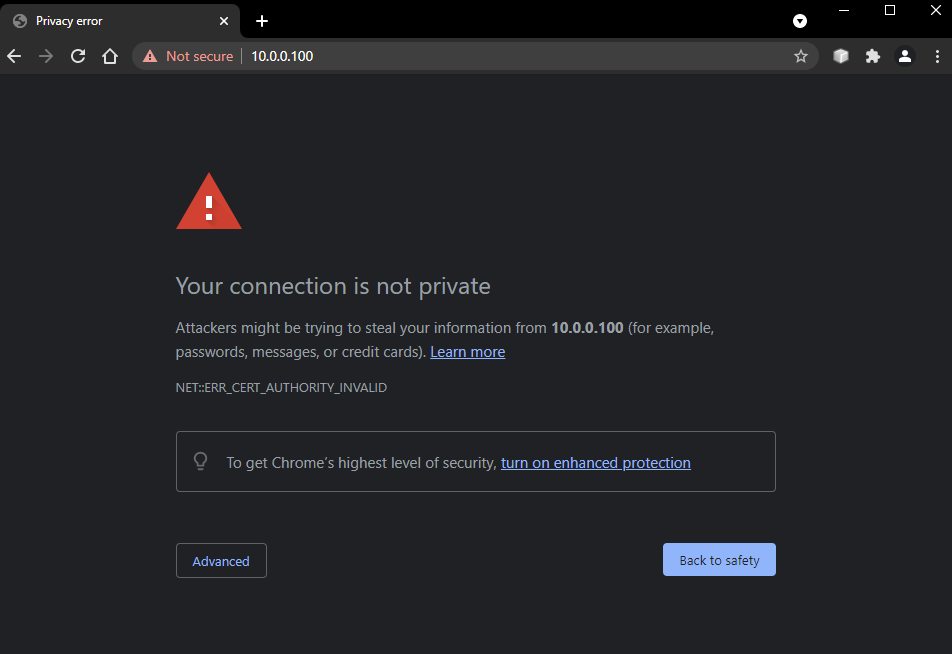
Now that your local server is able to serve pages using TLS encryption you can load pages using that TLS encryption using the HTTPS protocol. You will probably get warnings from your browser that there is still a problem. It will tell you that the connection is not private like Chrome does (Edge does the same thing only with slightly different wording):
Or, that there is a potential security risk like Firefox does:
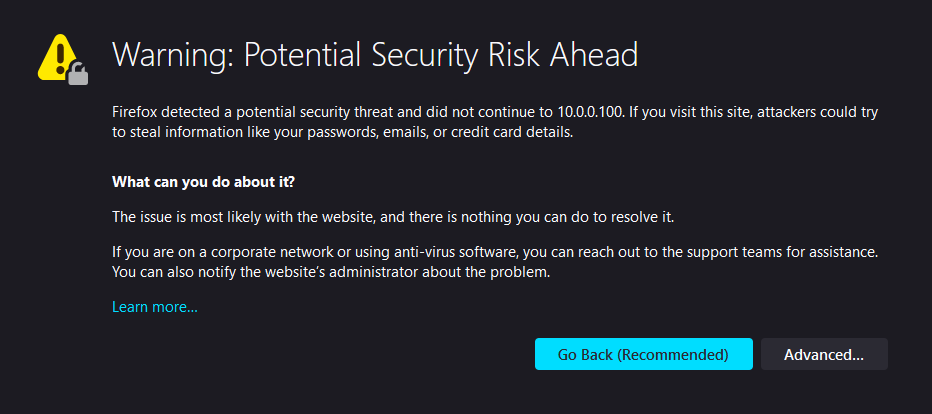
You can click the Advanced button and then proceed to the “unsafe” web page but that doesn’t seem like a good long-term solution. The problem is the the CA used to create the server’s TLS certificate is not trusted (it is self-signed by you and Windows and the browsers don’t recognize you as a trusted Certificate Authority).
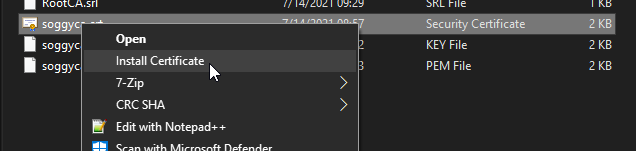
To fix this for Chrome and Edge, open File Explorer and find the .crt file you made in step 2 (that I called soggyca.crt). Right click on the certificate and select Install Certificate.
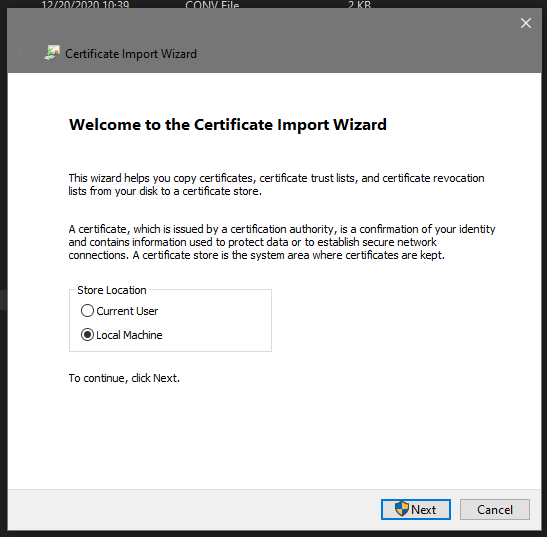
The installation wizard will open. Select Local Machine and click Next (this will require that you are the administrator).
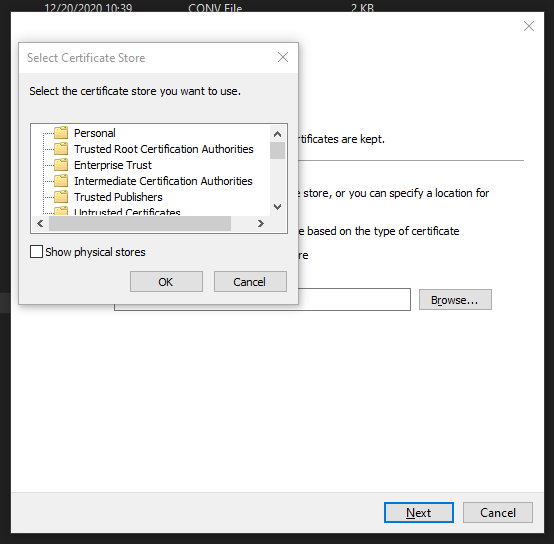
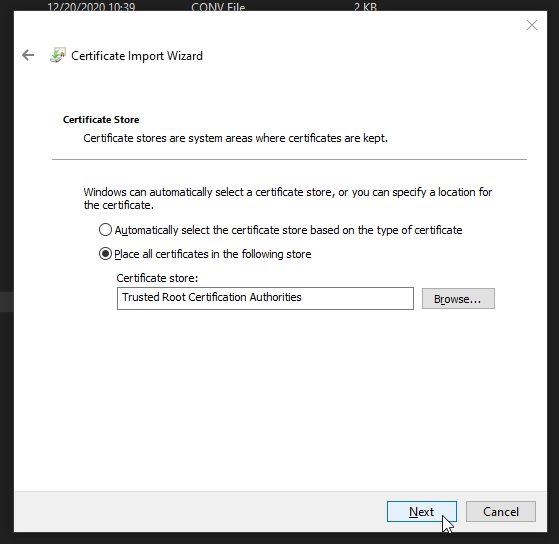
Select Place all certificates in the following store and click the Browse button.

Select Trusted Root Certification Authorities and click OK.
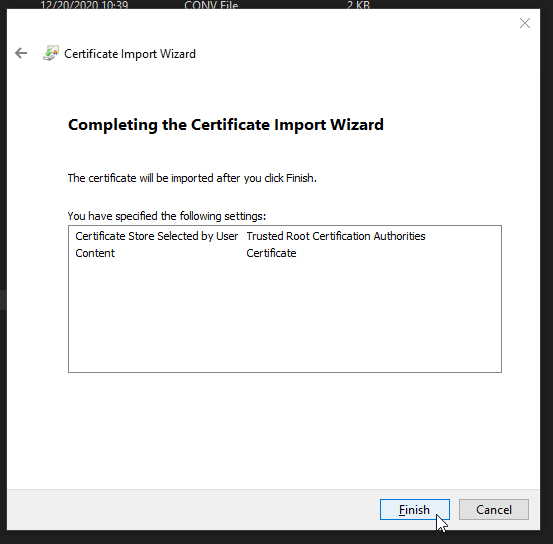
Now the wizard should look like this:
Click Next. Verify that things look right and click Finish.
You may have to reboot your computer to have the new root certificate recognized. When you navigate to a page hosted by your server you should see that page is secure and the lock symbol will not have any warnings and look “good”. If you click on the lock symbol you should see your server’s certificate information.
NOTE It doesn’t appear to be possible to have a private IP address (like 10.x.x.x) also be accepted as a valid secure URL. You will have to accept the connection and tell the browser to allow the connection anyway (create an exception for it). The connection will still be TLS secured but the browser will report that it is not trusted.